Xbox Game Bar là ứng dụng có sẵn, đi kèm miễn phí với phiên bản mới của Window 10. Vốn dĩ, phần mềm này được ra đời để giúp người chơi theo dõi hiệu suất máy tính của họ. Tuy nhiên, bạn vẫn có thể tận dụng tính năng của ứng dụng này để ghi lại màn hình máy tính của mình, ngay cả khi không chơi game.
Monday, July 18, 2022
Wednesday, July 13, 2022
How to Whitelist an Email Address in Office 365
- Open Microsoft 365 Defender
- Click on Policies and Rules and choose Threat Policies
- Open the Anti-Spam policies
- Scroll all the way down in the fly-out and click on Edit allowed and blocked senders and domains
Thursday, April 28, 2022
Tạo file .pfx để import vào IIS
Thông thường khi đăng ký chứng chỉ SSL, bạn sẽ nhận được các file như: domain.key, domain.crt… Tuy nhiên trên Windows sẽ không thể add các chứng thực trên vào vì không hỗ trợ các định dạng trên. Vì vậy cần convert qua định dạng windows hỗ trợ là PFX. Ta có thể sử dụng tool trung gian để convert các định dạng trên sang PFX.
Để tạo ra file pfx trên windows cần truy cập link https://www.ssl
Tuesday, April 26, 2022
Sửa lỗi vcruntime140_1.dll
Sửa lỗi vcruntime140_1.dll
Thursday, March 31, 2022
How to Enable or Disable SMBv2 in Windows 11/10.
How to Enable or Disable SMBv2 in Windows 11/10.
- Dùng PowerShell quyền Admin, chạy 3 lệnh bên dưới.
Commands Used:
1. Kiểm tra trạng thái SMB hiện tại
Get-SmbServerConfiguration | Select EnableSMB2Protocol
2. Bật SMB
Set-SmbServerConfiguration -EnableSMB2Protocol $true
3. Tắt SMB
Set-SmbServerConfiguration -EnableSMB2Protocol $false
Monday, March 21, 2022
Tìm kiếm 01 email gửi từ 01 IP
Tìm kiếm 01 email gửi từ 01 IP
Get-TransportService | ForEach-Object {Get-MessageTrackingLog -Server $_.Name -MessageSubject "Quota warning" -Start (Get-Date).AddDays(-1) -EventId Submit } | Select-Object -Property Sender,OriginalClientIp
Friday, March 18, 2022
Khắc phục lỗi 0x0000011b khi kết nối máy in qua Printer Server
Chỉnh trên Printer Server, trường hợp không dùng Printer Server thì chỉnh trên máy Client
Vào Registry để khách phục lỗi error 0x0000011b
Với cách số 2 này bạn không cần gỡ bản cập nhật (KB5005565). Tiến hành theo các bước như sau.
Bạn nhấn Phím Windows + R mở hộp thoại Run tiếp theo nhập Regedit nhấn phím Enterđể mở Registry Editor.
Tìm đến khóa theo đường dẫn: HKEY_LOCAL_MACHINE\System\CurrentControlSet\Control\Print
Bạn tạo một giá trị DWORD-32bit mới có tên RpcAuthnLevelPrivacyEnabled và đặt giá trị của nó là 0 giống như ảnh bạn có thể thấy bên dưới:
Tuesday, February 22, 2022
Components code and abbreviation on Laptop motherboard
Components code and abbreviation on Laptop motherboard
COMPONENTS CODE
CODE COMPONENT
C :CAPACITOR
D IODE
IODE
F :FUSE
L :INDUCTOR
PC :POWER CAPACITOR
PD :POWER DIODES/DIODE
PL :POWER INDUCTOR
PQ :POWER TRANSISTOR
PR :POWER RESISTOR
PU :POWER INTEGRATED CIRCUIT
Q :TRANSISTOR
R :RESISTOR
T : Transformers
U :INTEGRATED CIRCUIT/BGA CHIP/EMBEDDED CONTROLER/BIOS IC,ETC
X : Terminal strips, terminations, joins .oscilator
Y : Crystal
COMPONENTS CODE
CODE COMPONENT
C :CAPACITOR
D
IODEF :FUSE
L :INDUCTOR
PC :POWER CAPACITOR
PD :POWER DIODES/DIODE
PL :POWER INDUCTOR
PQ :POWER TRANSISTOR
PR :POWER RESISTOR
PU :POWER INTEGRATED CIRCUIT
Q :TRANSISTOR
R :RESISTOR
T : Transformers
U :INTEGRATED CIRCUIT/BGA CHIP/EMBEDDED CONTROLER/BIOS IC,ETC
X : Terminal strips, terminations, joins .oscilator
Y : Crystal
Thursday, January 20, 2022
Sửa lỗi các máy Photocopy không scan được qua NAS khi upgrade lên version 7
Sửa lỗi các máy Photocopy không scan được qua NAS khi upgrade lên version 7.
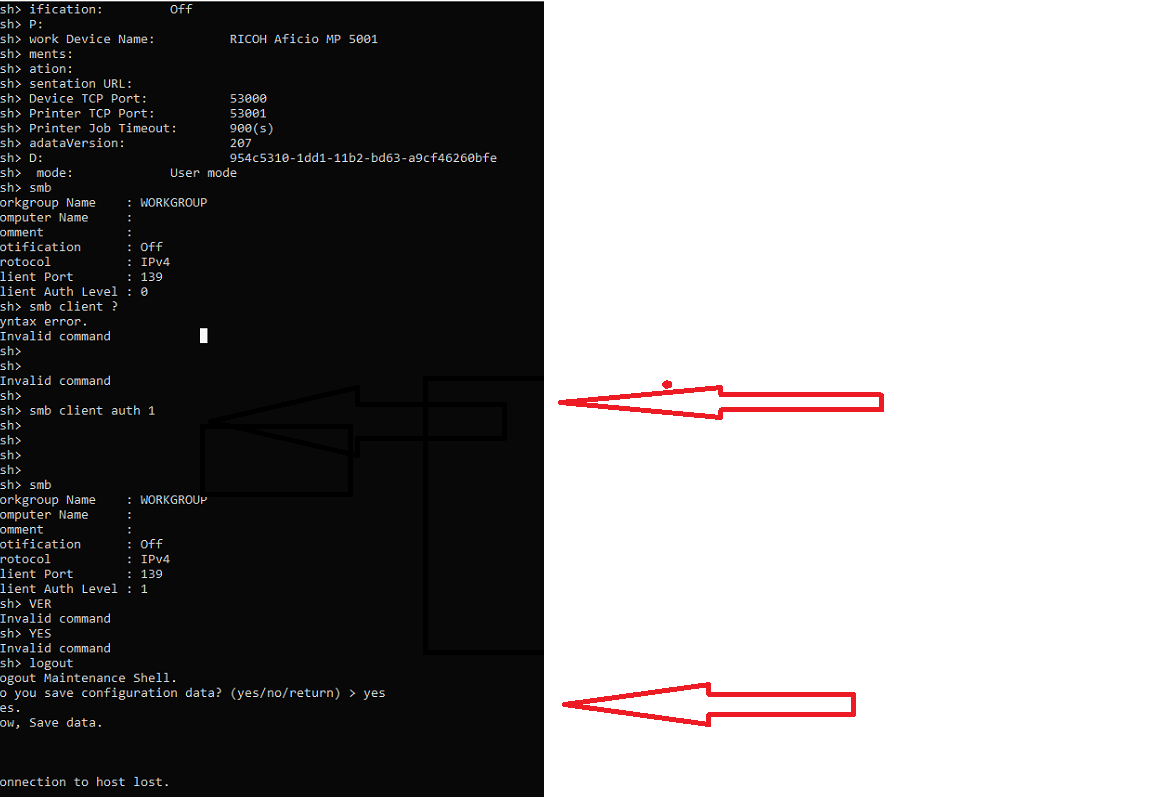
1. Telet vào máy photocopy
2. Kiểm tra smb client
Command: Show để kiểm tra tình trạng SMB hiện tại
3. Chỉnh smb client auth 0 --> 1
command: smb client auth 1
4. Bấm logout press enter
chọn "yes" để lưu cấu hình
Khởi động lại máy Photocopy
Thursday, January 6, 2022
Subscribe to:
Posts (Atom)